Showing posts with label DIY. Show all posts

Tuesday, December 1, 2020

25 Books for Christmas: A Christmas Family Tradition

small christmas tree with books underneath
Every other year, I put together a list of 25 books to read to the girls. Everyday of December, they open the wrapped book and we read it together. This year, I have added a few special things to our fun tradition and a few tricks to make it a bit easier on me!

25 Wrapped Books Take Forever

Seriously. You would not believe how long it takes to wrap 25 books! Instead of wrapping, I made an assortment of bag books this year. Some bags are small, some are large. It's important to have a variety of sizes.

See the blog post here for instructions on how to make the fabric bags!

Another wonderful option is to put your books in decorative boxes. You can reuse both the fabric bags or boxes each year.

If you aren't much of a seamstress, you can purchase cute fabric gift bags at Walmart.

I wanted to buy cute wooden tags for the bags, but they were super expensive. Instead, I just used an old cardboard box and cut out a tag shape I liked. I had the little wooden numbers for years, so I painted them and glued them on the tags with hot glue! Easy peesy!
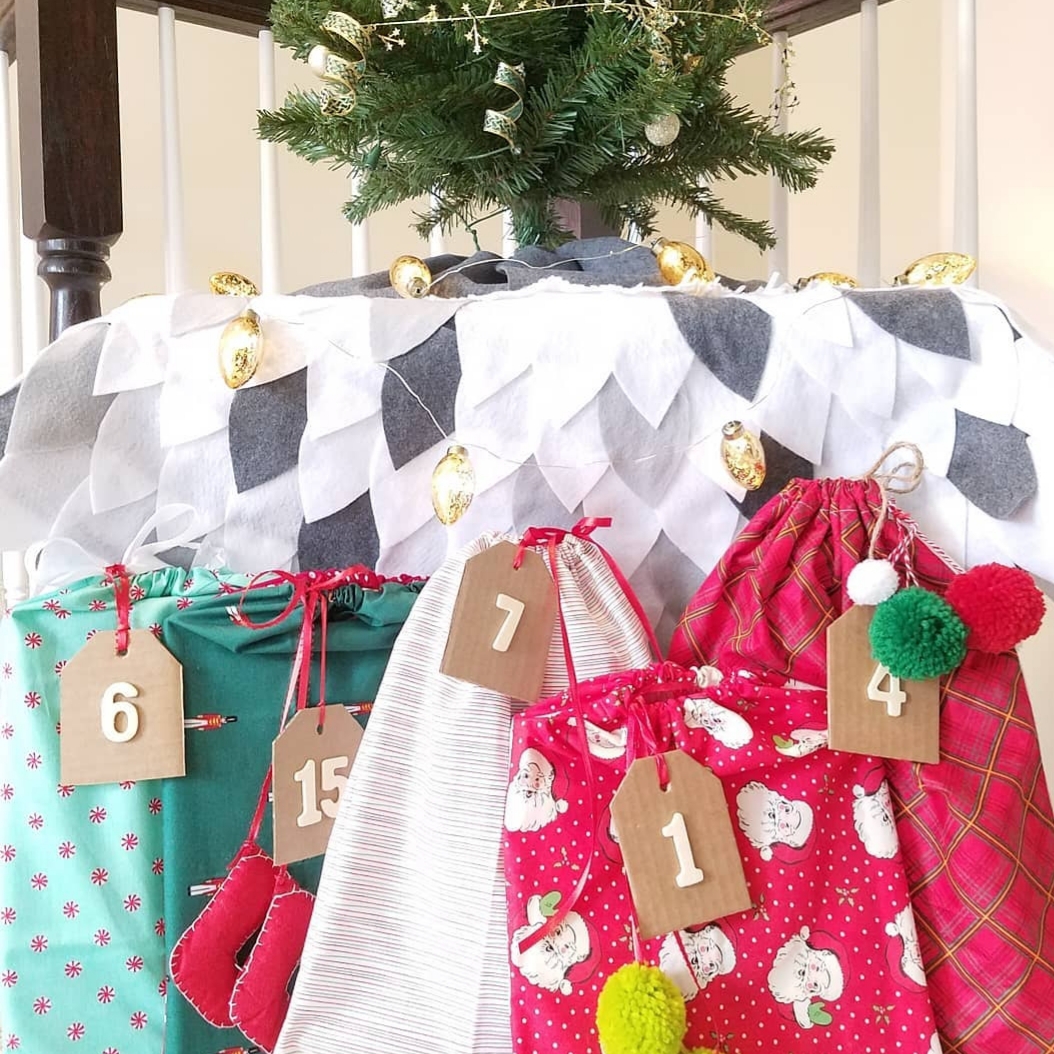
books in gift bags under a Christmas tree

Book Ornaments

Madeline's Christmas book
All the books sit wrapped under a special little Christmas tree upstairs. The tree is kind of bare in the beginning, but that is because each book has a special ornament with it. Once we read the book, the girls can hang the ornament that represents the book onto the tree!

I painted a peg "person" or two for each book. It helps remind them of the main characters in the book! [A little lesson on deciding who the main character or characters is a nice little English lesson, too!]

If you aren't an artist, you can find a special ornament that represents your book and use that for your tree. The ideas are endless!

Wizard of Oz Christmas ornaments
Our Book List

You may be wondering how on earth we find 25 books about Christmas. We don't! LOL! I tried that one year and it was way too hard. So instead, I have about 5 books that are about Christmas and the rest are books I wanted to add to our library.

I also like to have a little surprise or two. One day, the bag contains 3 coloring books and a package of the girls' favorite Crayola Brush and Detail Dual Tip Markers. On another day, we have a small Lego set for the family to put together. This year, it is a Harry Potter Lego kit. I will read a little bit of the Harry Potter series while they put together the Lego's with Dad!

Let me tell you...BOOKS ARE EXPENSIVE! All year long, I keep a list of books I want to add to our library. I start making the purchases by going first to ThriftBooks.com. What I can't find there, I purchase from Amazon. Another great idea is to find 25 books from your local library and use them!

Here is our list for this year. You can click on the title for a link to the book at Amazon.

1. What Should Darla Do?

2. Little Critter The Night Before Christmas

3. Frog and Toad are Friends: 50th Anniversary Edition

4. Shark Lady

5. Richard Scarry's Christmas Mice

6. The Story Orchestra: Sleeping Beauty

7. More Caps for Sale: Another Tale of Mischievous Monkeys

8. 1001 Things to Spot at Christmas

9. Once Upon a Goat

10. Argus

11. Churri and Chirra Under the Sea

12. Santa's Story

13. Oh No!

14. Madeline's Christmas

15. Marcel the Shell: With Shoes On

16. A Gift for Santa

17. Fox's Socks

18. Jamberry

19. Richard Scarry's Best Mysteries Ever

20. Each Peach Pear Plum

21. The Wonderful Wizard of Oz Pop Up Book

22. Did You See That Dinosaur?

23. The Skunk


If you have a book list, whether it is for the school year, the summer, or Christmas, I would love to hear your suggestions! This Mama needs to start preparing for Christmas 2022! (P.S. Our 25 Books for Christmas tradition is something we do every other year.)

~Andrea

DIY Fabric Bags for Christmas

fabric gift bags
How do you feel about fabric gift bags for wrapping Christmas presents? I love a good old fashioned paper and bow, but it does seem like a waste. Today, it's becoming quite popular to make reusable fabric bags for wrapping the presents. Here is a short tutorial of how to make a fabric gift bag.

What you will need for making fabric gift bags:

  • Assortment of fabric
  • Pinking sheers or a serger to keep the edges of the fabric from fraying
  • Sewing machine
  • Thread
  • Ribbon or cord
  • Pins
  • Large Safety Pin

Step One:

Cut rectangular shapes in various sizes. I suggest 8 inches by 14 inches, 11 inches by 22 inches, and for big items 36 inches by 72 inches.

cut fabric into large rectangles

Step Two:

Fold the rectangle in half with front sides of the fabric together.

Step Three:

Sew the bottom and the side of the bag, but be sure to stop about 2 inches from the top when you are sewing the side seam. That will leave room for the casing that holds the ribbon.

Sew bottom and side of fabric bag

Step Four:

Create the casing for your ribbon or cord by folding down the fabric and pinning it.

Make casing for fabric bag

Step Five:

Sew the casing.

Step Six:

Cut a long piece of ribbon or cord. Put a large safety pin at the end so that you can easily string it through the bag's casing.

Feed ribbon or cord into fabric bag casing   
how to make a fabric gift bag


Step 7:

Turn the bag right-side-out, add the present, and pull the string to close.

finished fabric gift bag

~Amie

Saturday, November 14, 2020

Seven Ideas for Repurposing Your Clothes


Do you re-purpose clothing? I absolutely hate throwing away clothes! Even if it has a rip, a hole, a stain or is two sizes too small, I just think to myself, "I bet I could make something out of that!"


Here are a few things I do to re-purpose clothing:

1) When the kids were young and growing like crazy, I would buy new, long sleeve shirts in the fall and make sure they were nice and roomy in size. Then, come springtime, I would cut all the sleeves off and hem them to make into short-sleeves. Saved me a ton of money! By the end of summer, the shirt had been well worn and outgrown.

Summer T-shirts made from long sleeve
fall shirts!
2) When my skirts get too small, I resize them smaller for my girls. I did this with my old dresses, too. A too-tight dress had just the right amount of fabric to make a girls size dress for a toddler!

3) I use scarves to make one-of-a-kind pillows. The colors are often unique and I love that! When the scarf is too sheer or light-weight, you can put another more sturdy fabric (like a cotton blend or muslin) behind it.

4) Favorite old sweater have a hole in it? Turn it into a pair of mittens! I have crocheted many a pair of mittens for a variety of service projects, but this idea of using old sweaters is AWESOME! I have all my sweaters washed and ready, but haven't yet tried to make these mittens. Here's a quick tutorial to show you how I plan to make them!


5) Do you have a bunch of stained t-shirts? My mom would cut them up and use them as rags for cleaning. That's great, but you can only use so many rags! My friend Jodie uses her old T-shirts to make quilts. It's a pretty popular thing to do these days, especially if you have been collecting your children's favorite T's for awhile. Hopefully, the stains aren't on the front/middle of the T-shirt! Here's an example of one of Jodie's T-shirt quilts!


6) Here's an idea from my grandmother. Cut old cotton clothes into long strips about 1/4 to 1/2 inch wide. Sew the ends together for a giant ball of fabric "yarn". Use the yarn to crochet an old fashioned rug. You can also use cut up denim from old jeans. P.S. You will need a really big crochet hook! I suggest size N.

7) Do you have old flannel Christmas jammies? We have had a tradition of Christmas Jammies for over a decade and I just hate throwing them out...even though they usually have a hole or two in the knee! Instead, use the flannel Christmas jammies as fabric for fun Christmas crafts like these little trees!

I saw an almost identical set of flannel Christmas trees at Walmart recently and decided to make some myself. 

Want to try to make some too? Here's what you need:
1. old flannel jammies with a Christmas theme
2. a dowel rod the size you think is appropriate (I liked the precut dowel rods, here.)
4. scissors, regular or pinking shears for a fun look
5. needle and thread
6. cotton stuffing 

Grandma would be proud of me for taking to heart the old adage "Use it up, wear it out, make it do, or do without!"

The Fletcher Farmhouse has entered into an affiliate relationship with Walmart. Clicking on links provided in this blog article may result in a commission being paid to The Fletcher Farmhouse at no additional cost to you.

Saturday, March 23, 2019

DIY: Appliqued Bunny Pillows

Spring has sprung and I am seeing bunnies, eggs, chicks, and flowers. I love everything about the Easter season...including decorating the home! I have always wanted pillows to match the changing seasons, but honestly, where do people keep all those pillows? So, I had a great idea! What if I made pillow covers that could easily be stored when not in use and quickly put on existing pillows to change up the home decor? Follow along as I share how I made these adorable pillow covers in just 2 hours!


What You Will Need

You will need 2 pillows, preferably the same size. Pick out a nice weight fabric for the pillow cover. In this case, I used a cotton canvas fabric in off-white. Next, choose a fun print for the bunny. This fabric doesn't necessarily have to be heavy. I have successfully used cotton, muslin, and even chenille.

If the fabric you choose for your cutout bunny is flimsy at all, I highly suggest purchasing some iron-on interfacing. This will give you added stability and a better overall aesthetic.

Go to Google or draw out your own bunny outline. Print and cut out the bunny to use as a template.

Be sure you have a tape measure, scissors for fabric, pins, matching thread, iron, ironing board, and a sewing machine. Here we go!

Step One

Measure your pillow's dimensions and add a 1/2 inch to each side. I like to add an inch and a 1/2 along the bottom so I have plenty of room later. (You'll see why!)

Using the measurements you just took, mark out a square on your heavier fabric. I like to fold the fabric and then cut the remaining three sides, but you can cut all four sides, if you wish.

Remember to square-up your square so it will not be crooked! I do that with a steel carpenter square.

Step Two


Lay out the fabric you have chosen for the bunny. Lay your pattern on the fabric and pin down well. Cut around the shape carefully.

Step Three


Assuming you need to add stability to your bunny cutout, open your iron-on interfacing and lay it across your table with the glue dots up. I like using HeatnBond, fuseable, lightweight interfacing.

Place the bunny (right side up) on the glue side of the interfacing. Pin down well and cut around it.

To adhere the iron-on interfacing to the fabric, you will need an iron. Turn it on a high setting and turn the steam off. Be sure to take the pins out of the bunny cutout, leaving the interfacing attached. It will stick to most fabrics because of its naturally rough texture. Place the iron on the bunny and press firmly for a few seconds. Move around until you have adhered the interfacing to the fabric bunny.


Step Four


Find the middle of the pillow cover fabric. To do that, fold it in half and half again. Mark the center with a piece of chalk. Do the same to the bunny.


Match the center of the bunny with the center of the pillow cover and pin down well. Now, it's time to sew!

Step Five


I prefer to set my sewing machine stitch on a medium sized zigzag, but you can use a decorative or blanket stitch, as well. Sew around the edges carefully. Trim any excess threads when done.

Step Six


With right sides together, pin the sides of the pillow cover together. Remember, you will want to leave the bottom open so you have a place to insert the pillow.


Here, I pop over to the serger and serge the seams together for a nice finished look, but you don't have to do that step. No one will see the inside seams of your pillow! If you do use a serger to sew the seams, I suggest going back over the seams with a straight stitch on the sewing machine. This will make the seam stronger.

Step Seven


Turn the pillow cover case right-side-out and press. Put the pillow insert in the pillow and whip stitch the bottom closed with some thread and needle. And, tada! You have a darling bunny pillow for Easter!


The Fletcher Farmhouse has entered into an affiliate relationship with Amazon. Clicking on links within this post may result in a commission being paid to The Fletcher Farmhouse at no additional cost to you.